








Creating a reclaimed wood picture frame is a rewarding project that adds personal flair to your home. Not only does it showcase your favorite photos, but it also emphasizes sustainability by repurposing wood. This guide will walk you through the entire process, from selecting the right wood to finishing touches that will make your frame stand out. By the end, you will have the skills and confidence to craft a beautiful piece that complements your decor.
- Select quality reclaimed wood for durability and aesthetics.
- Measure carefully to ensure a perfect fit for your pictures.
- Use non-toxic finishes to enhance and protect your frame.
Table of Contents
Selecting the Right Reclaimed Wood
Choosing the right reclaimed wood is the first crucial step in building your picture frame. Not all reclaimed wood is equal, and selecting quality materials can make a significant difference in both appearance and durability. Look for wood that has a rich patina, as it often has more character and tells a story of its past life. Additionally, inspect the wood for any signs of rot or damage. You want wood that is solid and free from cracks that could compromise the frame’s strength.
Common sources for reclaimed wood include old barns, shipping pallets, and vintage furniture. Each type of wood brings a unique texture and color, so consider what look you want for your frame. For instance, barn wood tends to have a rustic feel, while wood from old furniture may have a more polished appearance. Visit local salvage yards or online marketplaces to find wood that resonates with your design vision.
Types of Reclaimed Wood
Here are some popular types of reclaimed wood you might consider:
- Barn Wood: Known for its weathered look, barn wood often has a mix of colors and textures.
- Palettes: Shipping pallets can be disassembled and repurposed, offering a cost-effective option.
- Old Furniture: Vintage tables or cabinets can provide beautiful wood with intricate patterns.
- Flooring: Reclaimed hardwood flooring can be a rich source of character and beauty.
Once you have selected your wood, ensure it is clean and free from any chemicals or pests. A thorough sanding might be necessary to prepare it for the next steps.
Gathering Tools and Materials
Before starting your project, gather all necessary tools and materials. Having everything on hand will streamline the process and prevent interruptions. Essential tools for crafting a reclaimed wood picture frame include a saw, measuring tape, square, drill, and clamps. You will also need materials like wood screws, wood glue, sandpaper, and finishing products such as paint or varnish.
Here’s a detailed list of tools and materials you will require:
- Tools:
- Hand saw or miter saw
- Measuring tape
- Square for precise corners
- Drill for making holes
- Clamps to hold pieces together
- Materials:
- Reclaimed wood boards
- Wood screws
- Wood glue
- Sandpaper (various grits)
- Finish (paint, stain, or varnish)
Having the right tools not only makes assembly easier but also ensures your finished product looks professional. If you’re unsure about specific tools, many local hardware stores offer rental options for larger equipment.
Measuring and Cutting Your Wood
Accurate measurements are vital for a well-fitting picture frame. Start by deciding the size of the frame based on the photo you want to display. Measure the width and height of the photo, and add an extra half inch to each dimension for a snug fit. This extra space allows for any slight variations in the wood or photo size.
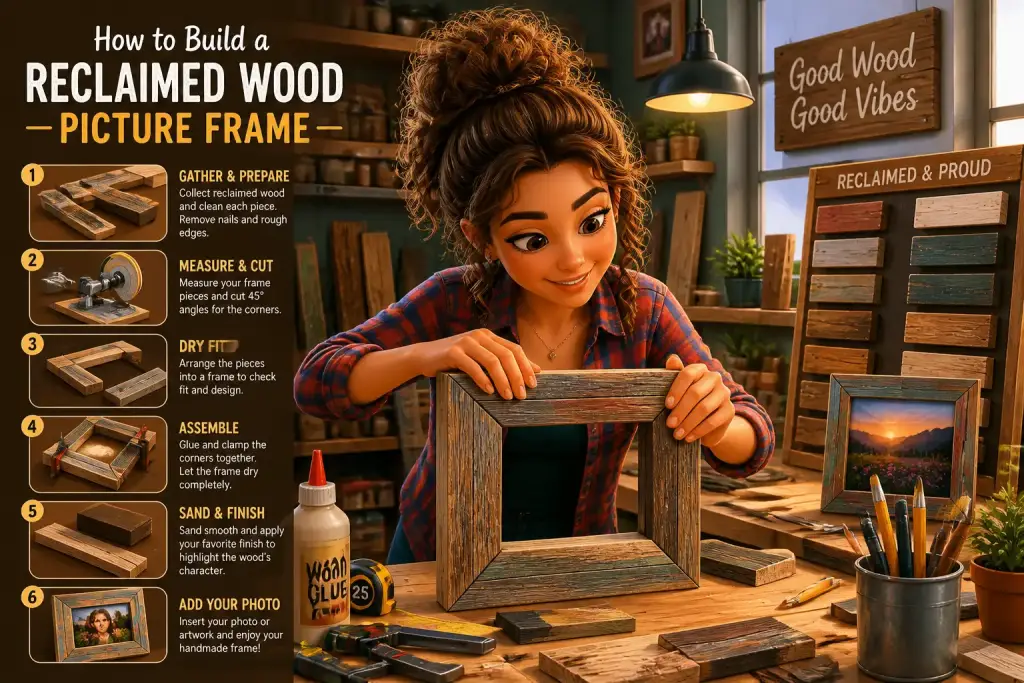
Once you have your measurements, mark the wood using a pencil. Use a square to ensure your lines are straight, which will help create clean cuts. When cutting your wood, take your time. A steady hand and slow, deliberate movements will yield the best results. If you are using a miter saw, set the angle according to your design. Most picture frames use 45-degree angles for the corners.
Step-by-Step Cutting Guide
- Measure the width and height of your photo, adding an extra half inch.
- Mark your cut lines on the reclaimed wood.
- Use a miter saw to cut at 45-degree angles for the corners.
- Sand the edges to remove any splinters or rough spots.
After cutting, check that all pieces fit together correctly. Arrange the cut pieces on a flat surface to visualize how they will come together. This step is essential to ensure that your frame will hold the photo securely.
Plan your cuts ahead to minimize waste and make the most of your reclaimed wood.
Assembling the Frame
With all pieces cut and ready, it’s time to assemble your picture frame. Begin by laying the frame pieces face down on a flat surface. Apply wood glue to the edges where the pieces will connect, ensuring a strong bond. Press the pieces together and use clamps to hold them in place while the glue dries. The drying time for wood glue can vary, so check the manufacturer’s instructions for guidance.
After the glue has set, reinforce the corners with screws. Drill pilot holes to prevent the wood from splitting, then insert screws at each corner. Ensure the screws are flush with the surface to maintain a smooth finish. If you wish, you can also add corner brackets for additional support, especially if the frame will hold a larger picture.
Frame Assembly Tips
- Use clamps to hold pieces tightly while the glue dries.
- Drill pilot holes for screws to prevent wood splitting.
- Consider adding corner brackets for larger frames.
Once assembled, give your frame a final inspection. Check for any gaps or misalignments. If everything looks good, move on to the finishing touches.
Finishing Touches for Your Frame
Finishing your reclaimed wood picture frame is where you can add personal flair and protection. Start by sanding the entire frame with fine-grit sandpaper. This step smooths the surface and prepares it for any finish you choose. Pay attention to corners and edges, as these areas can be rough after assembly.
After sanding, decide whether you want to paint, stain, or leave the wood natural. If you choose to paint, select a non-toxic option that complements your decor. For staining, apply a wood conditioner first to ensure even color. Allow the finish to dry completely before handling the frame.
Applying the Finish
Here’s how to apply a finish to your frame:
- Sand the frame to a smooth finish.
- Apply a wood conditioner if using stain.
- Choose a color and apply the stain or paint evenly.
- Let it dry completely before touching.
Once the finish is dry, you can apply a clear topcoat for added protection. A spray or brush-on polyurethane works well to shield the wood from moisture and wear.
Displaying Your Reclaimed Wood Frame
Your reclaimed wood picture frame is now complete and ready to showcase your favorite photo. Choose a suitable location that highlights the frame’s beauty. Consider placing it on a mantel, hanging it on a wall, or displaying it on a shelf. If you plan to hang it, make sure to use appropriate hardware that can support the frame’s weight.
Think about how the frame will coordinate with your overall decor. A rustic frame can add charm to a modern space, while a sleek finish might suit a minimalist style. Arrange the frame amongst other decorative items for a curated look, or pair it with other reclaimed wood pieces for a cohesive theme.
Creative Display Ideas
Here are some ideas for displaying your frame:
- Group multiple frames of different sizes for a gallery wall effect.
- Incorporate your frame into a seasonal display with other decor items.
- Use your frame to highlight special moments, like weddings or family events.
Remember to change the photo regularly to keep your display fresh and interesting. This practice keeps the reclaimed wood frame relevant and allows you to share new memories.
Maintaining Your Reclaimed Wood Picture Frame
Proper maintenance will ensure that your reclaimed wood picture frame lasts for many years. Start by dusting it regularly with a soft cloth to keep it clean. Avoid using harsh chemicals or cleaners that can damage the wood’s finish. If the frame becomes scratched, lightly sand the area and reapply the finish to restore its beauty.
Inspect the frame periodically for any signs of wear or damage. Look for loose screws or cracks that may need attention. Addressing these issues early will help maintain the frame’s structural integrity.
Maintenance Tips
- Dust regularly with a soft cloth.
- Avoid harsh chemicals; use mild soap and water if needed.
- Check for loose screws or cracks and repair promptly.
By taking care of your reclaimed wood picture frame, you honor the materials’ history while enjoying its beauty in your home. This project not only showcases your photos but also reflects your commitment to sustainable practices.
Embracing the Art of Reclaimed Wood Crafting
Building a reclaimed wood picture frame is just the beginning of your journey into the world of reclaimed wood crafting. This project combines creativity with sustainability, allowing you to express your style while making eco-conscious choices. As you gain confidence in your skills, consider exploring other reclaimed wood projects, such as furniture or decorative items.
Engaging in reclaimed wood crafts can be a fulfilling hobby, offering both personal satisfaction and a way to beautify your space. Over time, you will develop your techniques, discovering what works best for you. Take the time to experiment with different designs and finishes to make each piece truly unique.
For those looking to improve their skills further, resources are available to help you manage time effectively on projects or streamline your processes. Consider exploring tips for managing time or streamlining your process to enhance your crafting experience.
With each reclaimed wood project, you contribute to a sustainable future while adding your personal touch to your home. Enjoy the process, and let your creativity shine.